Beginner's Path
-
Before you get started
Studio talk with Maya Clubine -
Pastel Paper with Maya Clubine
-
Making marks with Rebecca de MendonçaLimbering up
-
Broad energetic strokes
-
Smudging and Softening
-
Hatching
-
Twisting and turning
-
Combining techniques
-
Portraiture for Beginner's with Estelle RobinsonWhat makes a good reference photo?
-
Things to remember
-
Eyes
-
Things to Remember
-
Head Position
-
Things to Remember
-
Backgrounds
-
Things to remember
-
Drawing Children
-
Things to remember
-
Creating Texture in Hair
-
Things to remember
-
Seascapes with Tricia TaylorUnderpainting - Part 1
-
Underpainting - Part 2
-
Underpainting - Part 3
-
Wet Sand - Part 1
-
Wet Sand - Part 2
-
Wet Sand - Part 3
-
Wet Sand - Part 4
-
Beginner Wave - Part 1
-
Beginner Wave - Part 2
-
Beginner Wave - Part 3
-
Landscapes with Nina SquireDorset Dunes Colour Chart
-
Dorset Dunes Reference Images
-
Dorset Dunes Part 1
-
Dorset Dunes Part 2
-
Woody Walks Materials and images
-
Woody Walks Part 1
-
Woody Walks Part 2
-
Woody Walks Part 3
-
Woody Walks Part 4
-
Colour Theory with Tricia TaylorMixing Colour - Part 1
-
Mixing Colour - Part 2
-
How not to make mud
-
Creating Optical Illusions With Warm and Cool Colours, with Julie SwanCreating Optical Illusions With Warm and Cool Colours
-
Skies with Sandra OrmeSandra's Notes for Clouds
-
White Cloud Edges
-
Making Grey Clouds Interesting
-
Cloudburst Rain
-
Sandra's Notes for Sunset Skies
-
Sunset Sky - Stage 1
-
Sunset Sky - Stage 2
-
Sunset Sky - Stage 3
-
Boat Tutorial with Julie SwanBoat Tutorial
I call this image Serenity. I took the reference photo whilst on holiday in Cornwall a couple of years ago on the Roseland Peninsula. Such a beautiful place and I really hope you enjoy painting it with this tutorial.
I am very drawn to boats and water, maybe because I grew up on the Thames Estuary in Essex and I love photographing them. When you work from a photo you can be creative about what you do to it to make it more appealing, a little poetic license. You can also edit things in and out as you choose. For instance, I also have the image of the blue dinghy altered with Procreate software on an iPad so that it is a red boat rather than blue. Using a photo editing app allows you play with various elements of your photos to create an image you want.
Materials
Paper Fisher 400 (or UART or Pastelmat) 12 x 12 inch
Unison Pastel List
Choose your colours and do a swatch. In the photograph there are some examples of colours that could be used and how I would lay them down to see how they look. I recommend always trying out your colours first on a piece of spare paper because they will often look totally different on the paper and when placed against other colours.
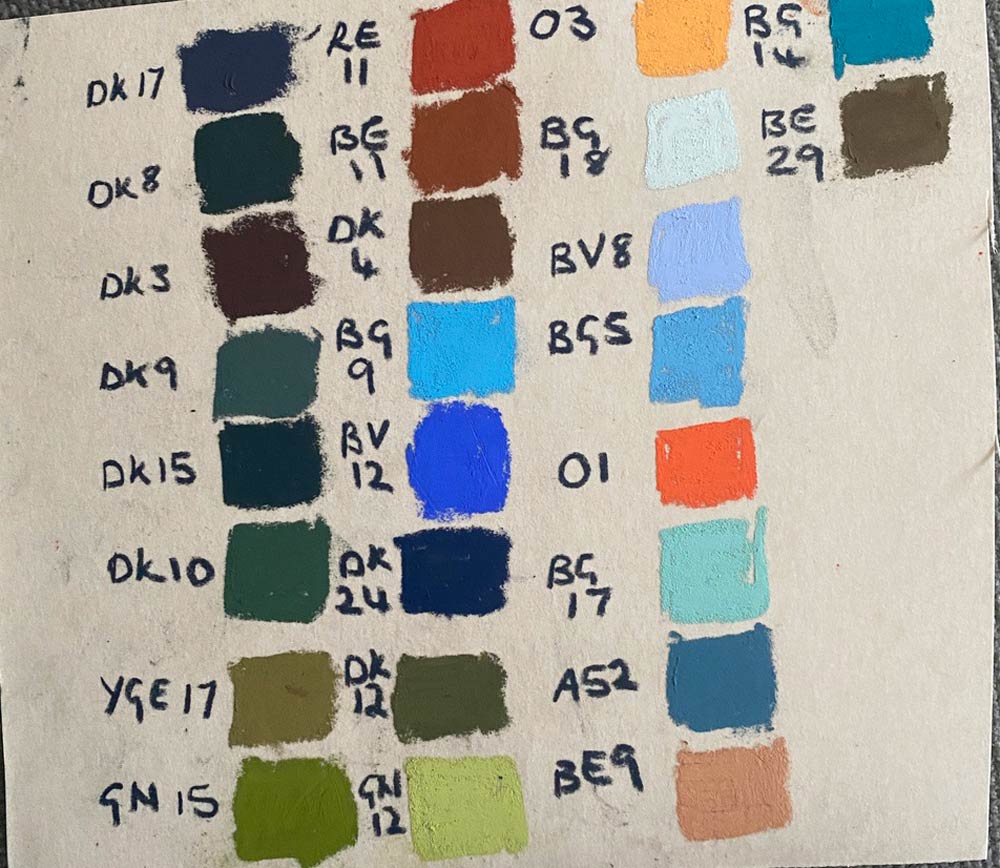
| DK3 DK4 DK8 DK9 DK10 DK12 DK15 DK17 DK24 RE11 YGE17 GN12 GN15 | BE9 BE11 BE29 BG9 BV12 BG18 BG14 BG17 BV8 BG5 A52 O1 O3 |

A few pastel pencils are useful for the fine details such as cutting in around the edge of the boat to sharpen up the edges. You can always use small shards of pastels which I collect and store because they have nice sharp edges.